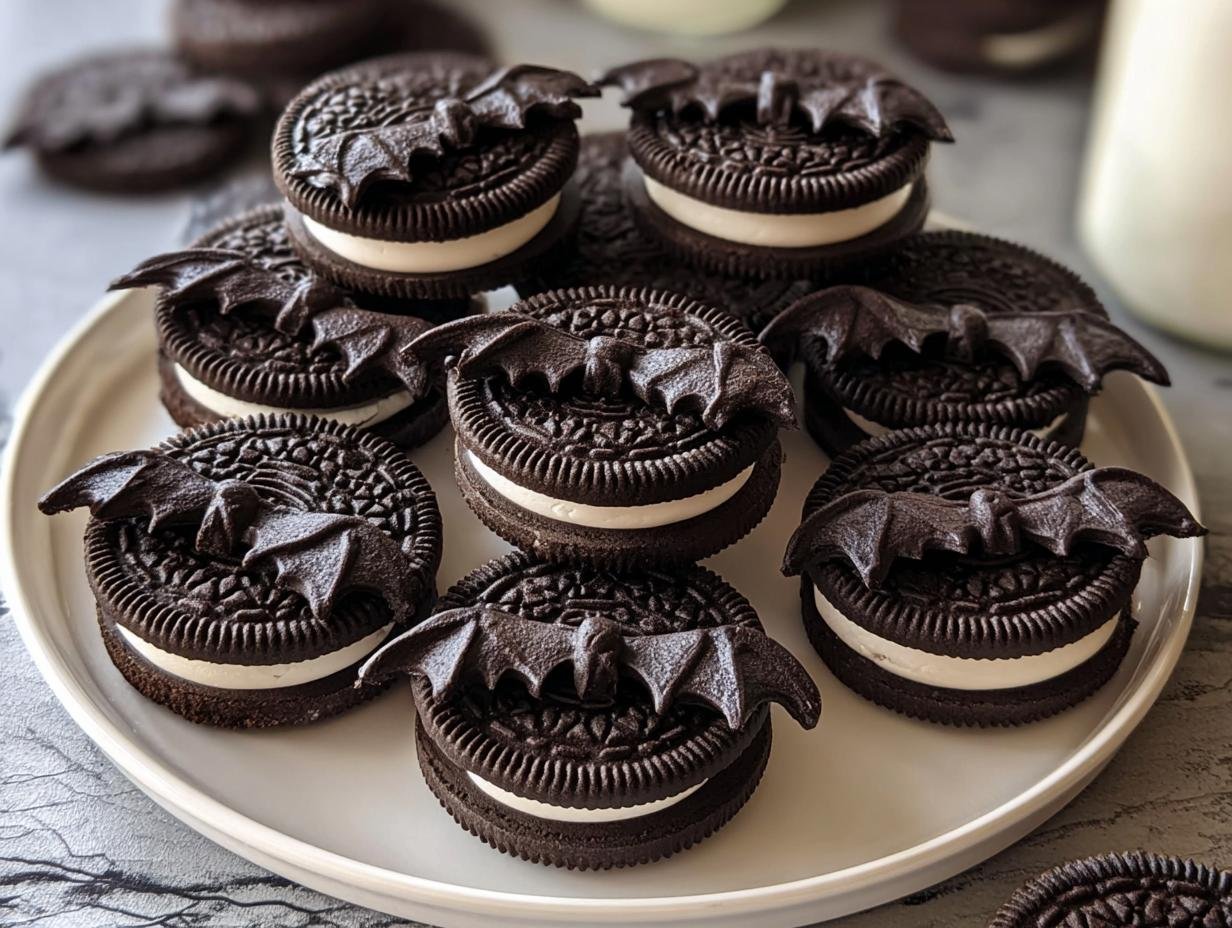
Get Spooky Bat Oreos have become my absolute go-to for Halloween parties. I remember the first time I tried making them – I was aiming for something cute and spooky, and the result was even better than I imagined! The smell of sweet chocolate filling the kitchen always brings back that excitement. These aren’t just cookies; they’re little edible decorations that capture the fun of Halloween. Learning how to make Bat Oreos was surprisingly simple, and the payoff is huge with how much everyone loves them. Let’s get cooking!
Why You’ll Love This Get Spooky Bat Oreos Recipe
These aren’t just any cookies; they’re a gateway to Halloween fun! You’ll adore them because:
- They taste incredibly indulgent, with the classic Oreo crunch meeting smooth, sweet candy melts.
- The prep time is astonishingly short, making them perfect for last-minute treats.
- While not specifically “healthy,” they offer a vegetarian option for your Halloween spread.
- They are incredibly budget-friendly, transforming a simple pack of Oreos into festive delights.
- These are truly easy Spooky Bat Oreos that kids and adults alike will adore.
- They are a fantastic family-friendly activity for Halloween crafting in the kitchen.
- The visual appeal is unmatched, making your dessert table instantly more festive.
- You’ll find these easy Spooky Bat Oreos are a crowd-pleaser at any Halloween party.
Ingredients for Your Spooky Bat Oreos
Gather these simple items to transform your classic cookies into adorable bat shaped Oreo cookies. You’ll be amazed at how these few ingredients come together for such a festive Halloween treat!
- 1 package Oreo cookies – the perfect base for our spooky transformation
- 1 cup black candy melts – these create the dark, mysterious bat bodies
- 1/2 cup white candy melts – for adorable little bat wings that pop
- Black edible marker – essential for drawing those cute bat faces
The candy melts are key here; they provide a smooth, glossy coating that hardens beautifully, making these Spooky Bat Oreos look professionally done with minimal effort. Using a small bat-shaped cookie cutter for the white candy melts is optional but helps create perfectly shaped wings!

How to Make Get Spooky Bat Oreos
Creating these adorable Halloween Bat Oreos tutorial cookies is a snap, and the results are incredibly charming! You’ll need a few minutes and a little bit of patience, but trust me, they’re worth every second.
- Step 1: Preheat your oven to a low temperature, around 200°F (95°C). This gentle heat helps the candy melts set without scorching. Line a baking sheet with parchment paper – this is crucial for easy removal later.
- Step 2: Melt the black candy melts in a microwave-safe bowl. Heat in 30-second intervals, stirring between each, until completely smooth and pourable. Be careful not to overheat them, or they can seize up.
- Step 3: Dip each Oreo cookie halfway into the melted black candy melts. Use a fork or a dipping tool to ensure it’s evenly coated. Let any excess drip off before placing it onto the prepared parchment paper.
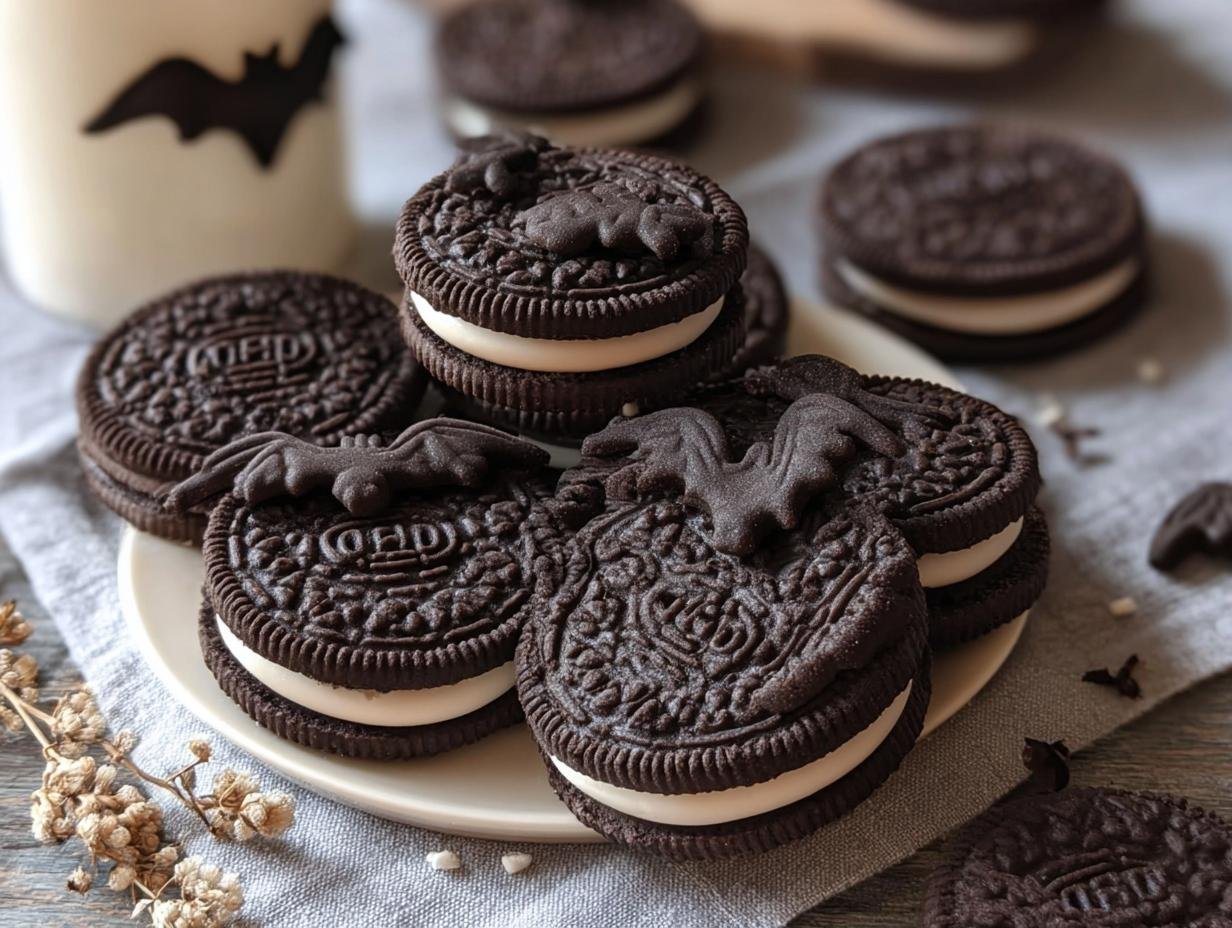
- Step 4: As soon as you place the coated Oreo on the paper, it’s time to add the wings! While the black coating is still soft, gently press two small white candy melt bats onto the sides of each cookie. If you shaped them beforehand with a mini bat cutter, they should adhere easily. This is a key part of our Halloween Bat Oreos tutorial!
- Step 5: Now for the cute faces! Grab your black edible marker and draw two small dots for eyes and a little curve for a mouth on the black coating. You can get creative here – some bats might look a little mischievous!
- Step 6: Let the candy melts harden completely. This usually takes about 5-10 minutes. You can speed this up slightly by placing the baking sheet in the refrigerator for a few minutes, but avoid leaving them in too long, as condensation can form.
- Step 7: For an extra touch of detail, grab a toothpick. You can use it to gently etch faint lines on the white candy melt wings to mimic texture, adding to the realism of your Spooky Bat Oreos.
- Step 8: Once fully hardened, carefully peel your Get Spooky Bat Oreos off the parchment paper. Arrange them on a festive platter. The contrast between the black bodies and white wings is so striking, and they truly look like they’ve flown right out of a spooky story!
Pro Tips for the Best Get Spooky Bat Oreos
To ensure your bat shaped Oreo cookies are absolutely spooktacular, keep these tips in mind. They’ll help you achieve professional-looking results with minimal fuss, making your Halloween dessert table truly shine.
- Always use fresh Oreos! Stale cookies can crumble when dipped.
- Work in a cool environment. Warmth can make the candy melts too soft to handle properly.
- If your candy melts start to thicken, reheat them gently in short bursts.
- Don’t overcrowd the parchment paper when placing dipped cookies; give them a little space.
What’s the secret to perfect Spooky Bat Oreos?
The real secret to the best Bat Oreos recipe is working with smooth, properly tempered candy melts. If they’re too thick, dip them quickly. If too thin, let them cool slightly before dipping your Oreos. For more on tempering chocolate, you can check out this guide.
Can I make Get Spooky Bat Oreos ahead of time?
Yes! These are fantastic for meal prep. Once fully hardened, store them in an airtight container at room temperature. They hold up beautifully for several days, making them perfect for prepping before your Halloween party. For other make-ahead dessert ideas, consider these Pistachio Pavlova Meringue Cakes.
How do I avoid common mistakes with Halloween Bat Oreos?
A common pitfall is overheating the candy melts, which makes them seize. Also, try to attach the wings while the black coating is still wet; waiting too long means they won’t stick well. Finally, ensure they are completely cool before storing. If you’re looking for more general baking tips, this article on baking tips for beginners might be helpful.
Best Ways to Serve Your Spooky Bat Oreos
These adorable Halloween party Bat Oreos are sure to be a hit, no matter how you serve them! They look fantastic arranged on a tiered dessert stand alongside other Halloween treats. Imagine a spooky graveyard scene with these little bats flying amongst ghost meringues or candy corn. For a fun twist, place them in individual cellophane bags tied with orange ribbon as party favors. They also pair wonderfully with a glass of cold milk or a warm mug of apple cider, making them the perfect complement to any festive fall gathering. These little guys really elevate the fun for any Halloween party Bat Oreos display!
Nutrition Facts for Get Spooky Bat Oreos
When you’re enjoying these delightful Spooky Bat Oreos, here’s a general idea of what you’re getting per cookie. They’re a fun Halloween treat, and knowing the basics helps when planning your party spread.
- Serving Size: 1 cookie
- Calories: 150
- Fat: 7g
- Saturated Fat: 3.5g
- Protein: 1g
- Carbohydrates: 22g
- Fiber: 1g
- Sugar: 20g
- Sodium: 75mg
Nutritional values are estimates and may vary based on specific ingredients used and the exact size of your bat decorations.
How to Store and Reheat Spooky Bat Oreos
Properly storing your DIY Bat Oreos for Halloween ensures they stay fresh and delicious for your party guests. After you’ve finished decorating, let the candy melts harden completely. It’s crucial they are fully set before you even think about packing them away. Once cooled, place your Spooky Bat Oreos in a single layer in an airtight container. Avoid stacking them directly on top of each other if possible, as the candy coating can stick.
For short-term storage, they’ll keep wonderfully at room temperature for about 3-4 days. If you need to store them longer, you can freeze them for up to 3 months. Wrap them well in plastic wrap, then place them in a freezer-safe container or bag. When you’re ready to serve frozen Spooky Bat Oreos, thaw them overnight in the refrigerator. Reheating isn’t usually necessary, but if you want to freshen them up slightly, a few seconds in a warm (not hot!) oven can help revive the coating’s shine.
Frequently Asked Questions About Get Spooky Bat Oreos
Can I use regular chocolate instead of candy melts for Spooky Bat Oreos?
While you can use regular chocolate, candy melts are generally recommended for this Get Spooky Bat Oreos recipe. Candy melts set firmer and have a glossier finish without needing to be tempered, making the decorating process much easier. If you use chocolate, you’ll need to temper it properly to achieve a similar smooth coating and prevent it from melting too easily.
How do I prevent the candy melts from cracking on my Spooky Bat Oreos?
Cracking usually happens when there’s a drastic temperature difference between the candy melts and the cookie, or if the melts are overheated. Ensure your Oreos are at room temperature and try not to overheat the candy melts. If they seem too thick, you can stir in a tiny bit of vegetable oil (not water!) to thin them out. This helps maintain a smooth coating for your Halloween Bat Oreos.
How to decorate Oreos like bats if I don’t have a bat-shaped cookie cutter?
No problem at all! You can still achieve adorable bat shaped Oreo cookies without a special cutter. Simply melt your white candy melts, let them cool slightly so they’re a bit thicker, and then use a spoon to dollop two small wing shapes onto the sides of the black-coated Oreo. You can use the back of the spoon to gently shape them into bat wings. It’s a bit more freehand but still looks fantastic for your Spooky Bat Oreos.
What are other spooky cookie ideas I can make with Oreos?
Beyond these fantastic Spooky Bat Oreos, you can create all sorts of Halloween-themed Oreos! Try dipping them in orange candy melts and drawing ghost faces with a black edible marker. You could also dip them in green candy melts and add candy eyes for monster Oreos. The possibilities are endless for creating custom Halloween dessert Bat Oreos!
Variations of Spooky Bat Oreos You Can Try
Once you’ve mastered the basic Get Spooky Bat Oreos, why not get creative? These Spooky Halloween cookie decorations are just the beginning! You can easily adapt this recipe to suit different tastes and dietary needs, making them perfect for everyone.
- Ghost Bat Oreos: Instead of black candy melts, dip your Oreos in white candy melts. Then, use the black edible marker to draw ghost eyes and a mouth. Add small white candy melt wings for a spectral twist!
- Monster Bat Oreos: Use green or purple candy melts for the main coating. For the wings, try using two smaller cookies or even candy corn pieces. Add multiple candy eyes for a truly monstrous look.
- Gluten-Free Bat Oreos: Simply swap out regular Oreos for your favorite gluten-free chocolate sandwich cookies. The candy melt coating works just as beautifully, ensuring everyone can enjoy these Spooky Halloween cookie decorations.
- Peanut Butter Bat Oreos: Use peanut butter sandwich cookies as your base and dip them in dark chocolate candy melts for a decadent flavor combination. The rich peanut butter and chocolate are a match made in Halloween heaven!

Get Spooky Bat Oreos: Easy Halloween Treat
- Total Time: 20 minutes
- Yield: Approximately 24 cookies 1x
- Diet: Vegetarian
Description
Create Spooky Bat Oreos for a Halloween celebration. This recipe transforms classic Oreos into charming bat-shaped cookies, perfect for parties and spooky fun.
Ingredients
- 1 package Oreo cookies
- 1 cup black candy melts
- 1/2 cup white candy melts
- Black edible marker
- Small bat-shaped cookie cutter (optional, for shaping candy melts)
Instructions
- Melt black candy melts according to package directions.
- Dip each Oreo cookie halfway into the melted black candy melts, ensuring it’s fully coated.
- Place coated Oreos on parchment paper.
- While the black coating is still soft, gently press two small white candy melt bat wings onto the sides of each cookie. You can use a small bat-shaped cookie cutter to shape the white candy melts before pressing them on.
- Use a black edible marker to draw small bat eyes and a mouth on the coated Oreos.
- Allow the candy melts to harden completely.
- For extra spooky bat Oreos, you can use a toothpick to create subtle texture on the wings.
- Arrange your Spooky Bat Oreos on a platter for a festive Halloween display.
Notes
- Ensure candy melts are smooth before dipping.
- Work quickly to attach wings before the coating hardens.
- Experiment with different candy melt colors for unique bat designs.
- These Spooky Bat Oreos are best enjoyed within a few days of making.
- Prep Time: 15 minutes
- Cook Time: 5 minutes
- Category: Dessert
- Method: No-Bake
- Cuisine: American
Nutrition
- Serving Size: 1 cookie
- Calories: 150
- Sugar: 20g
- Sodium: 75mg
- Fat: 7g
- Saturated Fat: 3.5g
- Unsaturated Fat: 3.5g
- Trans Fat: 0g
- Carbohydrates: 22g
- Fiber: 1g
- Protein: 1g
- Cholesterol: 0mg


Leave a Reply