
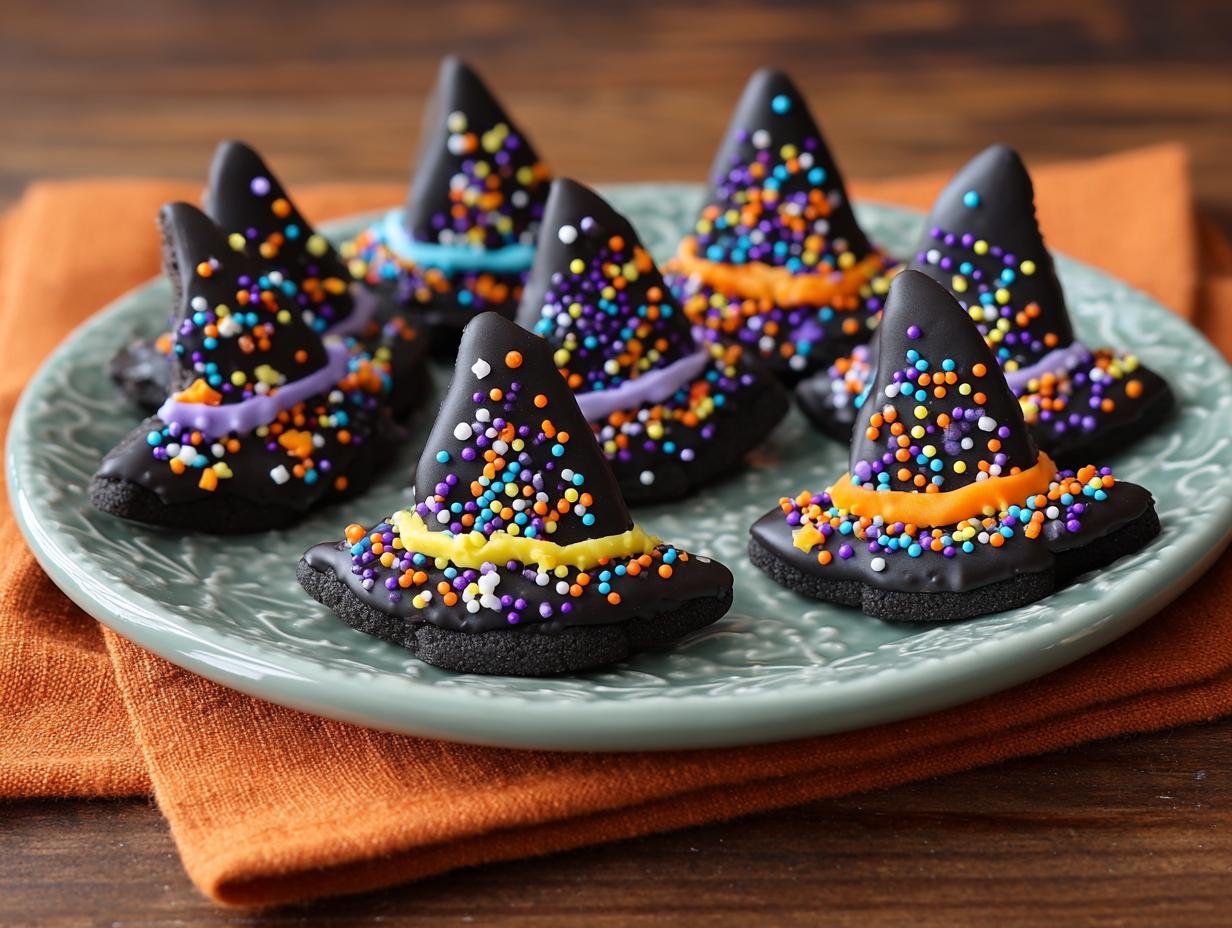
Witch Hat Cookies Spooky have been a favorite Halloween tradition in my family for years! I remember my mom making batches of these cute spooky witch hat cookies when I was little, and the smell of sugar and vanilla filled our kitchen. The best part was always decorating them with my siblings, laughing as we tried to make the perfect pointy hat and wavy brim. These aren’t just any cookies; they’re a gateway to festive fun and delicious memories. If you’re looking for a fantastic Halloween cookie idea witch hats, you’ve come to the right place. Let’s get baking these fun spooky witch hat cookies!
Why You’ll Love This Witch Hat Cookies Spooky
Get ready to wow your guests with these amazing Halloween witch hat cookies. They’re not just treats; they’re a centerpiece for your spooky dessert table!
- Super Easy to Make: Even if you’re new to baking, these homemade witch hat cookies spooky are incredibly simple to whip up.
- Perfect for Parties: These decorated witch hat cookies Halloween are a guaranteed hit at any Halloween party, bringing smiles to everyone.
- Visually Stunning: Their cute spooky witch hat cookies design makes them as fun to look at as they are to eat.
- Customizable Fun: Let your creativity shine! You can easily change up the colors and sprinkles to make truly unique spooky baked goods witch hats.
- Kid-Friendly Activity: Get the little ones involved in decorating; it’s a fantastic way to create lasting Halloween memories.
- Deliciously Sweet: Beyond the fun design, these are simply delicious cookies with a perfect balance of sweetness.
- Versatile Treat: They make a wonderful addition to any Halloween cookie ideas witch hats selection, fitting right in with other festive goodies.
Ingredients for Spooky Witch Hat Cookies
Gather these simple ingredients to create your festive Halloween witch hat cookies. I find using room temperature butter and eggs really makes a difference in the dough’s texture!
- 1 cup unsalted butter, softened – This is the base for a tender cookie.
- 1 cup granulated sugar – For sweetness and structure in our witch hat cookie recipe spooky.
- 2 large eggs, room temperature – They help bind the dough and add richness.
- 1 teaspoon vanilla extract – A classic flavor enhancer that smells amazing.
- 3 cups all-purpose flour – The main structure for our spooky treat witch hat cookies.
- 1 teaspoon baking powder – For a slight lift, making them less dense.
- 1/2 teaspoon salt – Balances the sweetness and enhances flavors.
- 1 cup powdered sugar – To make a smooth, sweet icing for decorating.
- 2-3 tablespoons milk – To thin the powdered sugar to the perfect drizzling consistency.
- 1/2 cup candy melts (black or purple) – These create the perfect hat brim for your decorated witch hat cookies Halloween.
- Halloween sprinkles – For that extra pop of color and festive flair!
How to Make Spooky Witch Hat Cookies
Let’s dive into creating these fun and festive Halloween witch hat cookies! This recipe is straightforward, and the results are always impressive. I love how the dough comes together, and the anticipation builds as you get ready to bake.
- Step 1: Preheat your oven to 350°F (175°C). Line two large baking sheets with parchment paper. This ensures your cookies don’t stick and makes for easy cleanup.
- Step 2: In a large bowl, cream together the 1 cup unsalted butter, softened and 1 cup granulated sugar until the mixture is light and fluffy. This step is crucial for a tender cookie texture.
- Step 3: Beat in the 2 large eggs one at a time, making sure each is fully incorporated before adding the next. Stir in the 1 teaspoon vanilla extract for that classic sweet aroma.
- Step 4: In a separate bowl, whisk together the 3 cups all-purpose flour, 1 teaspoon baking powder, and 1/2 teaspoon salt. This dry mix forms the base of our cookies.
- Step 5: Gradually add the dry ingredients to the wet ingredients, mixing on low speed or by hand until just combined. Be careful not to overmix, as this can lead to tough cookies.
- Step 6: Divide the dough in half. Flatten each half into a disc, wrap them tightly in plastic wrap, and chill in the refrigerator for at least 1 hour. This chilling step is key for easy handling when making these spooky witch hat cookies.
- Step 7: Once the dough is chilled, lightly flour your work surface and roll out one disc to about 1/4-inch thickness. Use a witch hat cookie cutter to cut out your shapes.
- Step 8: Carefully place the cut-out cookies onto the prepared baking sheets, leaving about 2 inches between each one.
- Step 9: Bake for 8-10 minutes, or until the edges are just lightly golden. You’ll know they’re ready when they smell wonderfully sweet. Let the cookies cool on the baking sheets for a few minutes before transferring them to wire racks to cool completely.
- Step 10: While your cookies are cooling, prepare the icing. In a small bowl, whisk together the 1 cup powdered sugar and 2-3 tablespoons milk until smooth. Add more milk, a teaspoon at a time, if you need a thinner consistency for drizzling.
- Step 11: Melt the 1/2 cup candy melts according to package directions. Black or purple are my favorites for that classic witchy look!
Rolling and Cutting the Dough
When rolling out your chilled dough, aim for a consistent 1/4-inch thickness for even baking. If the dough becomes too soft while cutting, pop it back in the fridge for a few minutes. Use a sharp cookie cutter for clean edges on your spooky treat witch hat cookies.
Baking and Cooling the Cookies
Bake your cookies at 350°F (175°C) for 8-10 minutes, watching for those lightly golden edges. It’s essential to let them cool on the baking sheet for a couple of minutes before moving them to a wire rack. They must be completely cool before decorating, or the icing will melt right off! For more baking tips, check out tips on baking ingredients.
Decorating Your Halloween Witch Hat Cookies
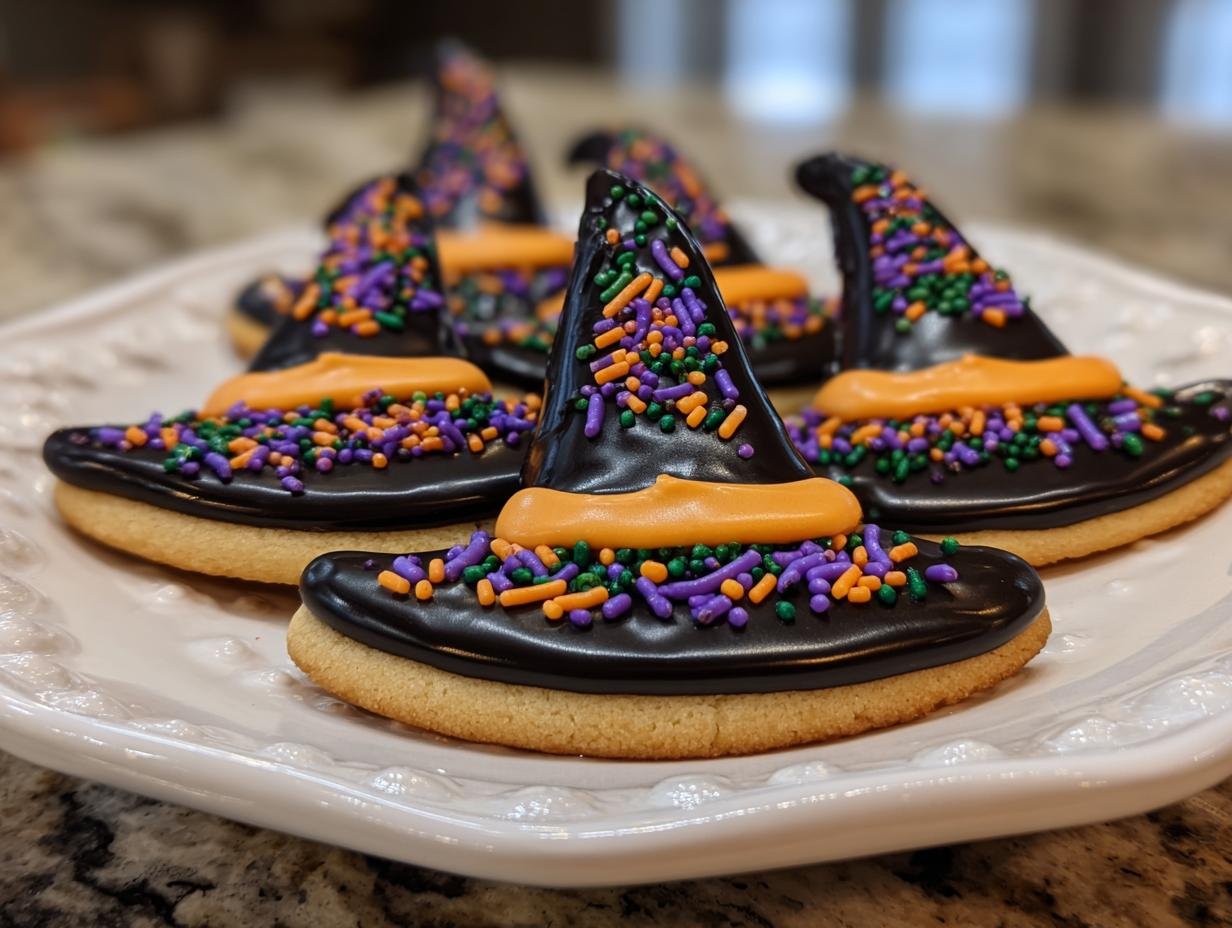
Once cooled, spread a thin layer of the prepared white icing over the top of each cookie. Then, gently dip the edges into the melted candy melts to create the hat brim. Immediately add your Halloween sprinkles while the candy melts are still wet. Arrange them creatively for truly festive decorated witch hat cookies Halloween!
Pro Tips for the Best Spooky Witch Hat Cookies
Want to elevate your Halloween cookie game? These little tricks will ensure your spooky witch hat cookies turn out perfectly every time. I’ve learned a few lessons over the years making these fun spooky baked goods witch hats!
- Chill is Key: Don’t skip the chilling step for the dough! It makes rolling and cutting so much easier, preventing the dough from spreading too much in the oven.
- Consistent Thickness: Roll your dough to an even 1/4-inch thickness. This ensures all your cookies bake at the same rate and have a uniform texture.
- Cool Completely: Patience is a virtue here! Make sure your cookies are fully cooled before decorating. Warm cookies will melt your icing and candy melts into a messy puddle.
What’s the secret to perfect spooky witch hat cookies?
The real secret is thorough dough chilling and consistent rolling. This prevents spreading, giving you those sharp, iconic witch hat shapes for your Halloween witch hat cookies.
Can I make spooky witch hat cookies ahead of time?
Absolutely! You can bake the undecorated cookies up to 3 days in advance and store them in an airtight container. Decorate them the day before your party for the freshest look. For other make-ahead ideas, consider easy cinnamon rolls.
How do I avoid common mistakes with spooky witch hat cookies?
Avoid overmixing the dough, which makes cookies tough. Also, don’t bake them too long, or they’ll get too brown on the edges. Ensure they’re completely cool before decorating to prevent melting.
Best Ways to Serve Halloween Witch Hat Cookies
These fun spooky witch hat cookies are so versatile! They’re perfect for a Halloween party dessert table, arranged with other spooky baked goods witch hats. You can also package them up as individual treats for trick-or-treaters or as party favors. For a delightful pairing, serve these cute spooky witch hat cookies with a glass of cold milk or a warm mug of apple cider, especially on a chilly autumn evening. If you’re looking for other festive desserts, try our pistachio pavlova meringue cakes.
Nutrition Facts for Spooky Witch Hat Cookies
When you’re enjoying these festive Halloween witch hat cookies, it’s helpful to know what you’re indulging in. These estimates give you a good idea of the nutritional breakdown per cookie.
- Serving Size: 1 cookie
- Calories: 180
- Fat: 8g
- Saturated Fat: 5g
- Unsaturated Fat: 3g
- Trans Fat: 0g
- Carbohydrates: 25g
- Fiber: 1g
- Sugar: 20g
- Protein: 2g
- Sodium: 50mg
- Cholesterol: 30mg
Nutritional values are estimates and may vary based on specific ingredients and portion sizes used for these spooky treat witch hat cookies.
How to Store and Reheat Spooky Witch Hat Cookies
Once your amazing Halloween witch hat cookies are fully cooled and decorated, proper storage is key to keeping them fresh and delicious. For short-term storage, place your decorated witch hat cookies Halloween in an airtight container at room temperature. They’ll stay wonderfully fresh for about 3 to 4 days. If you need to keep these festive spooky baked goods witch hats for longer, freezing is your best bet. Carefully wrap each cookie individually in plastic wrap, then place them in a freezer-safe bag or container. They can be frozen for up to 3 months. When you’re ready to enjoy them again, simply thaw the cookies in the refrigerator overnight. If you want to serve them slightly warm, you can gently reheat them in a low oven (around 300°F or 150°C) for just a few minutes, but be sure to watch them closely so they don’t burn! For more storage tips, consider how to store homemade tomato sauce.
Frequently Asked Questions About Spooky Witch Hat Cookies
Can I use a different cookie cutter for these spooky witch hat cookies?
While a witch hat cutter is ideal for these specific Halloween witch hat cookies, you could get creative! A simple round cookie cutter can work for the brim, and you can cut a triangle for the hat. You might need to adjust the dough consistency slightly if you’re not using a dedicated cutter.
What kind of sprinkles work best for decorating these Halloween cookie ideas witch hats?
For the most festive look on your decorated witch hat cookies Halloween, I love using classic Halloween sprinkles like jimmies, nonpareils, or even edible glitter. Black, purple, orange, and green are perfect colors to really make your cute spooky witch hat cookies pop!
How can I make sure my candy melt brims are even on my spooky treat witch hat cookies?
To get even brims, ensure your cookies are completely cool and flat. Dip the edge of the cookie into the melted candy melts and gently tap off any excess before placing it back on parchment paper. You can also use a small offset spatula to smooth the candy melt if needed before it sets. For more decorating inspiration, see our cinnamon orange jam linzer cookies.
Are these easy spooky witch hat cookies suitable for a bake sale?
Absolutely! These homemade witch hat cookies spooky are a huge hit at bake sales because they look so impressive and are delicious. Just make sure they are fully cooled and decorated before packaging them individually in clear cellophane bags for sale.
Variations of Spooky Witch Hat Cookies You Can Try
While the classic recipe for these spooky witch hat cookies is fantastic, don’t be afraid to get creative! Here are a few ways to switch things up for your next batch of Halloween witch hat cookies. You can easily adapt these ideas to make them your own special spooky treat witch hat cookies.
- Gluten-Free Fun: Swap out the all-purpose flour for a good quality gluten-free blend to make these a delicious option for those with gluten sensitivities. The texture will be very similar, ensuring you still get those perfectly cute spooky witch hat cookies.
- Chocolate Lover’s Dream: Incorporate cocoa powder into the cookie dough for a rich chocolate version of these Halloween cookie ideas witch hats. You could even use chocolate candy melts for the brim for an extra decadent touch.
- Spiced Cookie Twist: Add a pinch of cinnamon or pumpkin pie spice to the dry ingredients for a warm, autumnal flavor that complements the sweet icing and candy melts on your decorated witch hat cookies Halloween.
- No-Bake Shortcut: If you’re short on time, consider a no-bake version using crushed cookies or graham crackers mixed with a binder. This still gives you the fun witch hat shape for a creative witch hat cookies spooky treat!

Spooky Witch Hat Cookies: 1 Easy Magic Recipe
- Total Time: 1 hour 40 minutes
- Yield: 24 cookies 1x
- Diet: Vegetarian
Description
These spooky witch hat cookies are a fun and easy treat for Halloween. They are perfect for parties and are sure to be a hit with kids and adults alike. Enjoy making these delicious and decorative witch hat cookies.
Ingredients
- 1 cup unsalted butter, softened
- 1 cup granulated sugar
- 2 large eggs
- 1 teaspoon vanilla extract
- 3 cups all-purpose flour
- 1 teaspoon baking powder
- 1/2 teaspoon salt
- 1 cup powdered sugar
- 2–3 tablespoons milk
- 1/2 cup candy melts (black or purple)
- Halloween sprinkles
Instructions
- Cream together butter and sugar until light and fluffy.
- Beat in eggs one at a time, then stir in vanilla extract.
- In a separate bowl, whisk together flour, baking powder, and salt.
- Gradually add dry ingredients to wet ingredients, mixing until just combined.
- Divide dough in half, flatten into discs, wrap in plastic, and chill for at least 1 hour.
- Preheat oven to 350°F (175°C). Line baking sheets with parchment paper.
- Roll out dough to 1/4-inch thickness. Cut out hat shapes using a witch hat cookie cutter.
- Place cookies on prepared baking sheets, about 2 inches apart.
- Bake for 8-10 minutes, or until edges are lightly golden. Let cool on baking sheets for a few minutes before transferring to wire racks to cool completely.
- While cookies cool, prepare icing. In a small bowl, whisk together powdered sugar and milk until smooth. Add more milk if needed to reach desired consistency.
- Melt candy melts according to package directions.
- Once cookies are completely cool, spread a thin layer of white icing over the top of each cookie.
- Dip the edges of the cookies into the melted candy melts for the brim of the hat.
- Decorate with Halloween sprinkles and allow icing and candy melts to set.
- These spooky witch hat cookies are now ready to serve!
Notes
- For perfectly shaped witch hat cookies, chill the dough thoroughly.
- Use a sharp knife or cookie cutter to get clean edges.
- Experiment with different colors of candy melts and sprinkles for unique spooky witch hat cookies.
- Store decorated witch hat cookies in an airtight container at room temperature.
- Prep Time: 30 minutes
- Cook Time: 10 minutes
- Category: Dessert
- Method: Baking
- Cuisine: American
Nutrition
- Serving Size: 1 cookie
- Calories: 180
- Sugar: 20g
- Sodium: 50mg
- Fat: 8g
- Saturated Fat: 5g
- Unsaturated Fat: 3g
- Trans Fat: 0g
- Carbohydrates: 25g
- Fiber: 1g
- Protein: 2g
- Cholesterol: 30mg


Leave a Reply