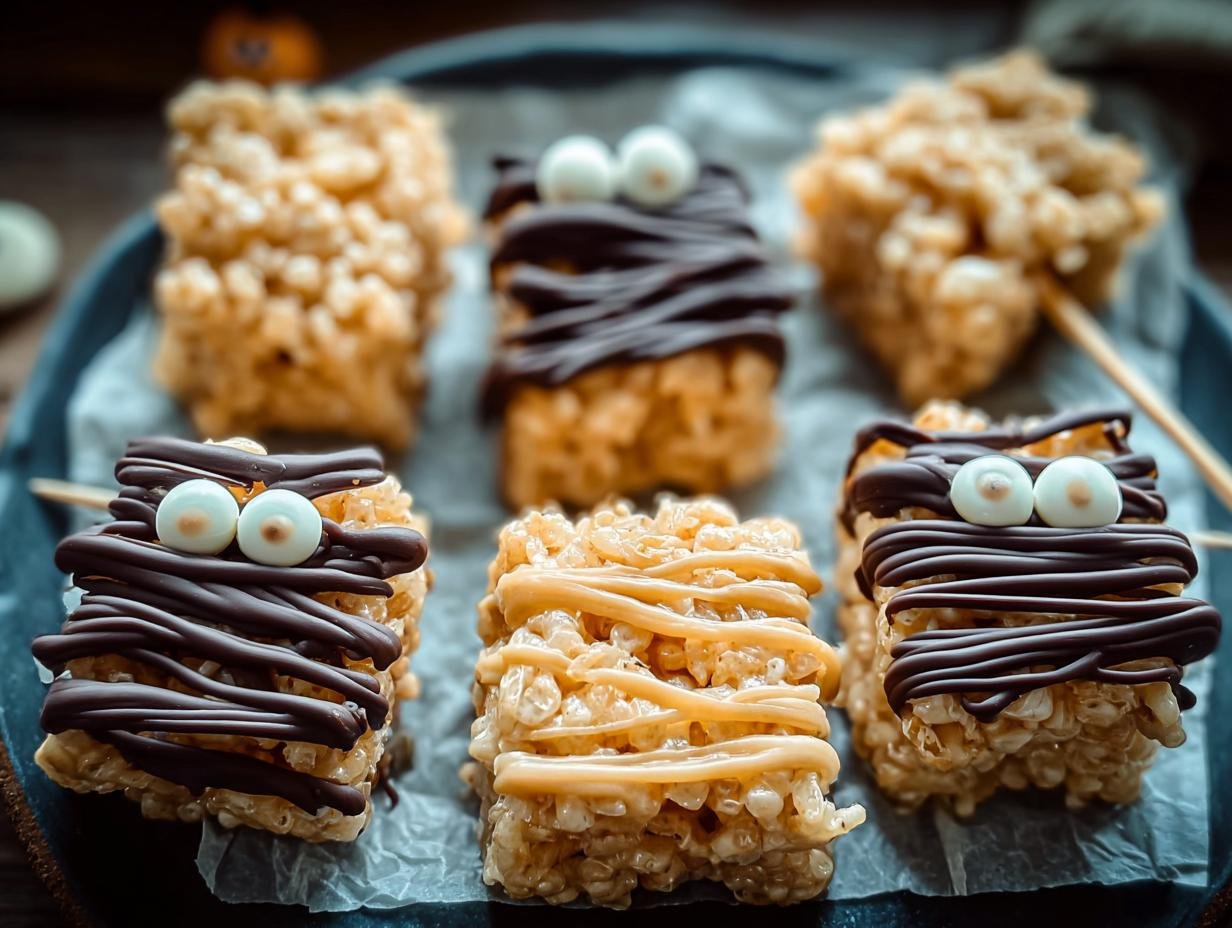
Spooky Halloween Mummy Rice has been a hit at my parties for years, ever since I first whipped up this adorable treat for my nieces. The moment they saw these little mummy characters peeking out from the treat table, their eyes lit up! I remember the crinkly sound of the Rice Krispies mixture as I pressed it into the pan, and the sweet vanilla scent that filled my kitchen. This Halloween mummy rice recipe is so simple, even the littlest ones can help decorate. It’s the perfect way to add a touch of playful fright to your festivities, and you’ll find this kid-friendly mummy rice Halloween favorite disappears in a flash. Let’s get cooking!
Why You’ll Love This Spooky Halloween Mummy Rice
You’re going to adore making and serving these fun Halloween treats. Here’s why:
- The taste is pure nostalgic bliss – that classic sweet and chewy marshmallow and crispy rice combo is always a winner.
- It’s incredibly quick to prepare, making it an easy mummy rice for Halloween that won’t keep you in the kitchen all day.
- While they’re a treat, they’re made with simple ingredients you likely already have on hand.
- They’re super budget-friendly, perfect for feeding a crowd at a Halloween party without breaking the bank.
- This is a fantastic activity for kids; they’ll have a blast helping decorate, making it a truly easy mummy rice for Halloween family affair.
- The spooky mummy presentation is a guaranteed hit with kids and adults alike, adding a fun visual element to your party spread.
- It’s a no-bake recipe, meaning less fuss and no need to worry about oven temperatures or times.
- These delightful treats are perfect for any Halloween gathering, from classroom parties to neighborhood get-togethers.
Ingredients for Halloween Mummy Rice
Gather these simple ingredients for a spooky good time! These are the components that make our Halloween mummy rice recipe so special and are perfect for your Halloween rice ideas for kids. You’ll find they’re quite straightforward, making the decorating process even more enjoyable.
- 6 cups Rice Krispies cereal – the base for our mummy treats, providing that satisfying crunch.
- 10 oz marshmallows – these act as the binder, giving our mummies their chewy texture.
- 3 tbsp butter – melted, to help the marshmallows melt smoothly and add a hint of richness.
- 1 cup white chocolate chips – for coating our mummies, creating that classic mummy wrap look.
- 1 tbsp shortening (optional, for smoother melting) – helps the white chocolate melt more evenly and stay fluid.
- Candy eyes – the essential finishing touch to bring our mummy rice treats to life!
How to Make Spooky Halloween Mummy Rice
Let’s get these spooky mummy treats ready! It’s surprisingly simple, and I’ll guide you through how to make mummy rice that looks impressive but is easy enough for anyone to master. You’ll love the process, and the results are just too cute!
- Step 1: Start by melting 3 tablespoons of butter in a large saucepan over low heat. Keep the heat gentle to avoid scorching the butter.
- Step 2: Add the 10 ounces of marshmallows to the melted butter. Stir continuously until the marshmallows are *completely* melted and smooth. This creates the sticky binder for our treats.
- Step 3: Remove the saucepan from the heat. Immediately stir in the 6 cups of Rice Krispies cereal until every piece is well coated in the marshmallow mixture. You’ll notice the satisfying crinkle and the sweet, toasty aroma.
- Step 4: Lightly grease a 9×13 inch baking pan with butter or cooking spray. Press the Rice Krispie mixture evenly into the pan. I like to use lightly greased hands or a piece of parchment paper to get a smooth, even layer. Let it cool completely for about 15-20 minutes.
- Step 5: Once cooled, cut the Rice Krispie mixture into your desired shapes. Rectangles or squares work perfectly for our mummy base.
- Step 6: Now, let’s prepare the mummy wraps. Melt the 1 cup of white chocolate chips (and 1 tablespoon of shortening, if using) in a microwave-safe bowl. Heat in 30-second intervals, stirring well after each, until the chocolate is smooth and pourable. Be careful not to overheat it! This is a key step in how to make mummy rice look authentic.
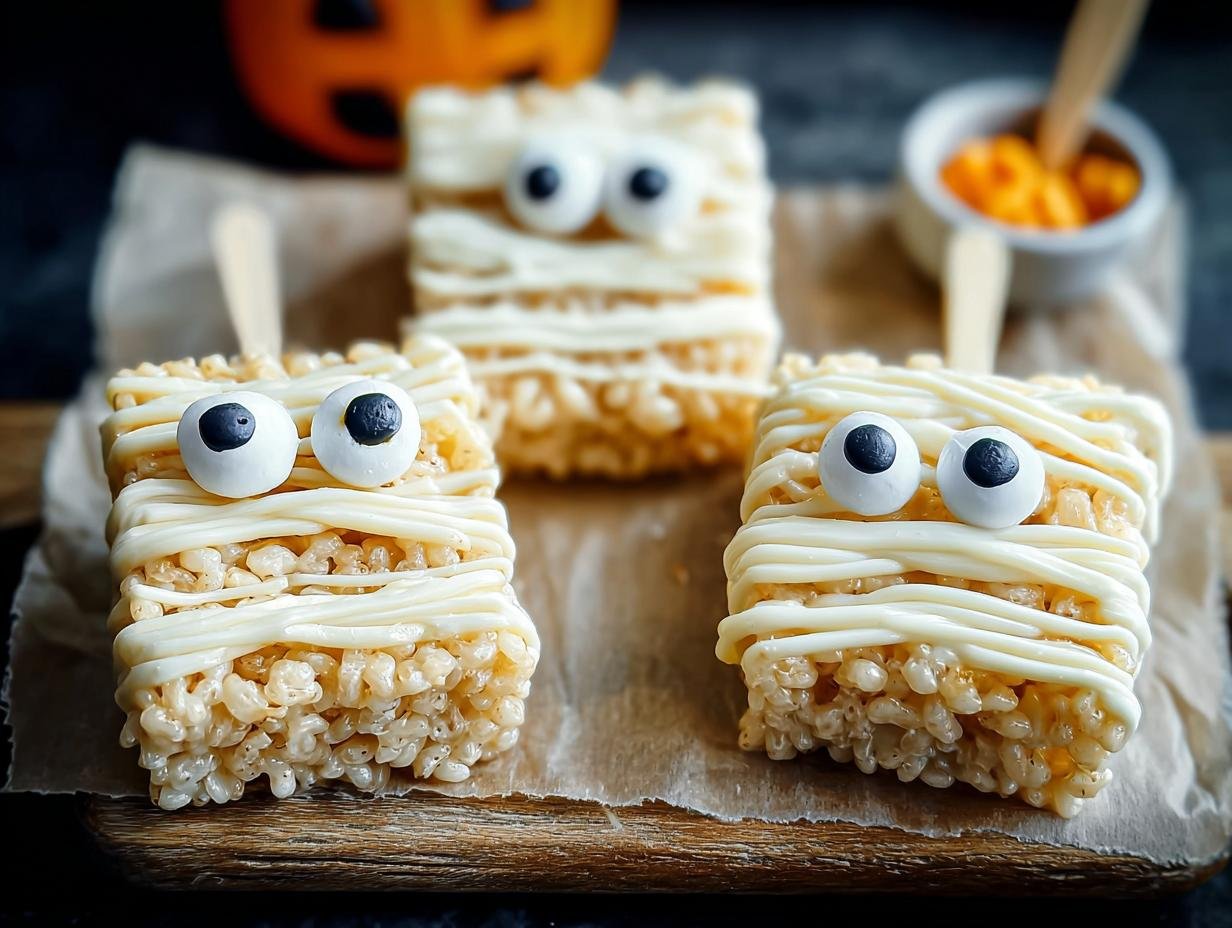
- Step 7: Dip each Rice Krispie treat into the melted white chocolate, coating about two-thirds of the treat to mimic the mummy’s body. Place the coated treats on a sheet of parchment paper.
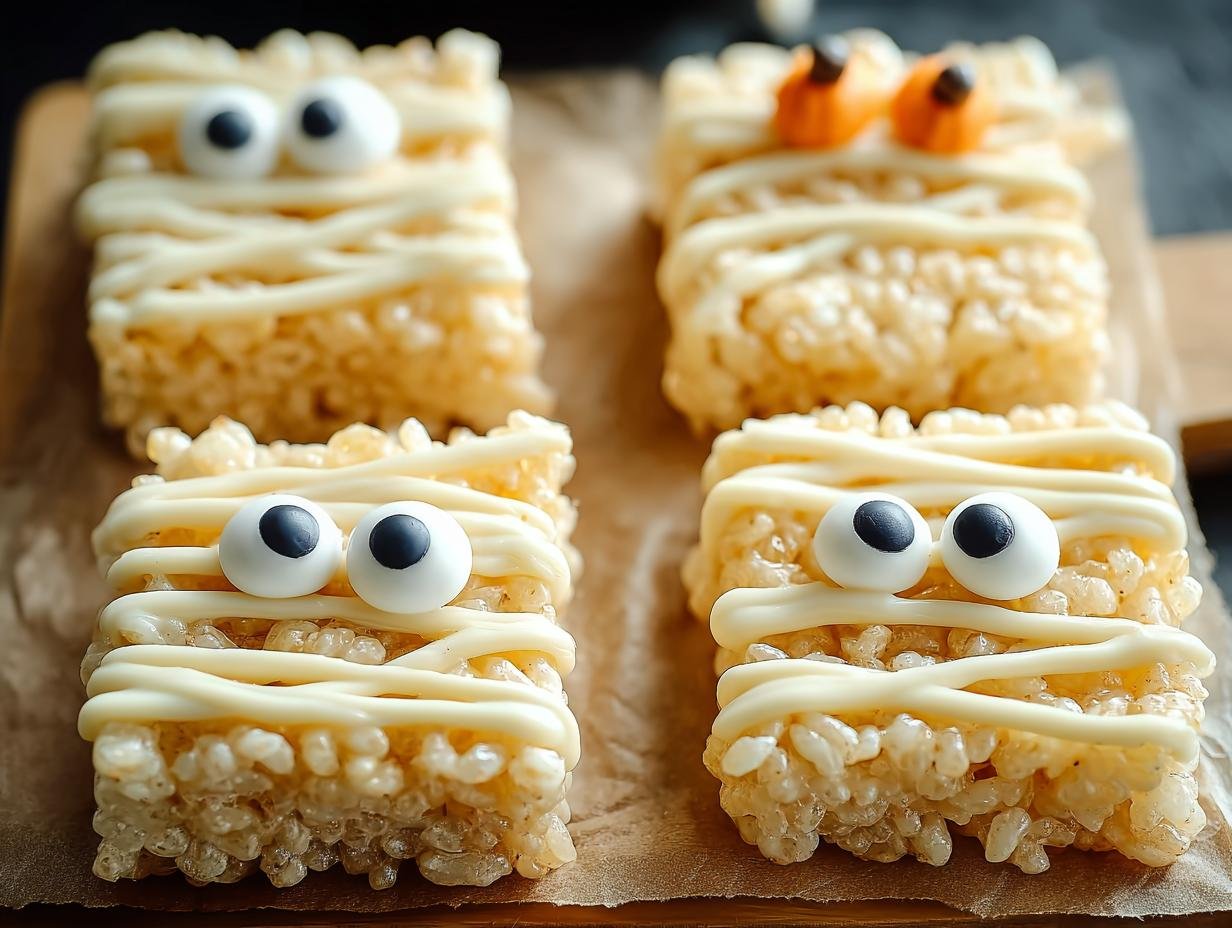
- Step 8: Before the chocolate hardens, it’s time for the mummy bandages! Use a piping bag or a small plastic bag with a corner snipped off to drizzle the remaining melted white chocolate over the treats in crisscrossing patterns. This is where you really bring your Halloween mummy rice to life!
- Step 9: While the chocolate is still wet, carefully place two candy eyes on each mummy treat. Press them gently into the chocolate so they stick.
- Step 10: Allow the white chocolate to set completely before serving. This usually takes about 15-20 minutes at room temperature, or you can speed it up in the refrigerator for a few minutes. And that’s how to make mummy rice!
Pro Tips for the Best Mummy Rice Halloween Party Food
Want to make your mummy rice treats absolutely perfect for your Halloween party? I’ve picked up a few tricks over the years that really make a difference. Follow these tips for the best results:
- Use fresh marshmallows: Stale marshmallows won’t melt as smoothly and can make your treats less chewy and sticky.
- Don’t overcook the marshmallows: Keep the heat low and stir constantly to prevent browning, which can affect the color and flavor of your mummy rice.
- Grease everything: Lightly grease your spatula, hands, and pan to prevent the sticky mixture from clinging everywhere, making assembly much easier.
- Work quickly with the cereal mixture once the marshmallows are melted, as it starts to set fast.
What’s the secret to perfect mummy rice for Halloween?
The real secret is in the consistency of your melted marshmallows and the gentle pressing of the cereal mixture. As for making them look unique, think of it as one of your fun creative Halloween rice crafts. The individual attention you give to wrapping and adding eyes makes each mummy special! For more creative ideas, check out these dessert recipes.
Can I make mummy rice ahead of time for a Halloween party?
Yes, absolutely! You can prepare the Rice Krispie base a day in advance and store it in the pan, covered tightly with plastic wrap. Once you’ve cut them and dipped them in chocolate, they’ll keep well at room temperature for another day or two. If you’re looking for other make-ahead treats, consider our easy cinnamon rolls.
How do I avoid common mistakes with Halloween mummy rice?
A common pitfall is using chocolate that’s too hot, which can melt the Rice Krispie treats. Let your melted chocolate cool slightly. Also, don’t overmix the cereal and marshmallow once combined; this can result in a denser, less chewy treat. For tips on working with ingredients, you might find information on vegetable nutrition helpful.
Best Ways to Serve Spooky Halloween Mummy Rice
Once your adorable mummy rice treats are ready, presenting them is part of the fun! They’re fantastic on their own, but here are a few ideas to make your Halloween spread even more spectacular. For a truly memorable Halloween dinner mummy style, consider serving these alongside savory dishes like mini mummy hot dogs or a hearty pumpkin soup. They also make a wonderful addition to a dessert buffet, perhaps alongside some ghost-shaped cookies or a spooky Halloween punch.
- Arrange them on a platter decorated with cobwebs or scattered candy corn for an extra festive touch.
- Serve them as part of a “monster mash” dessert bar where guests can mix and match spooky treats.
- Pair them with more savory Halloween party foods for a balanced menu that appeals to everyone. Consider our mediterranean chickpea salad for a lighter option.
Nutrition Facts for Mummy Rice Halloween Treats
Here’s a look at the nutritional breakdown for these fun Halloween treats. Keep in mind these are approximate values per serving, as individual results can vary slightly based on ingredients and portion size. This information is helpful for our Mummy Rice Halloween Party Food.
- Calories: Approx. 175
- Fat: Approx. 7g
- Saturated Fat: Approx. 4g
- Protein: Approx. 1g
- Carbohydrates: Approx. 28g
- Fiber: Less than 1g
- Sugar: Approx. 18g
- Sodium: Approx. 60mg
Nutritional values are estimates and may vary based on specific ingredients used.
How to Store and Reheat Mummy Rice Halloween Party Food
Keeping your adorable mummy rice treats fresh is easy, ensuring they’re perfect for any last-minute Halloween gatherings. Once the white chocolate has completely set, let the treats cool down to room temperature. This is crucial before storing them to prevent condensation inside the container. For the best results, store them in an airtight container. You can keep them at room temperature for up to 3-4 days, and they’ll retain their chewy goodness. If you need to make them even further in advance, these easy mummy rice for Halloween treats freeze beautifully! Wrap them individually in plastic wrap, then place them in a freezer-safe bag or container for up to 3 months. When you’re ready to serve them from frozen, allow them to thaw at room temperature for a couple of hours. There’s no need to reheat them; they are best enjoyed at room temperature!
Frequently Asked Questions About Spooky Halloween Mummy Rice
What is mummy rice Halloween?
What is mummy rice Halloween? It’s a fun, no-bake treat made from crispy rice cereal, marshmallows, and butter, shaped and decorated to look like a mummy. We use white chocolate to create the mummy bandages and candy eyes to give them a spooky, adorable appearance. It’s a fantastic way to get creative with your Halloween rice ideas for kids!
Can I use different types of chocolate for the mummy bandages?
Absolutely! While white chocolate is classic for the mummy look, you could experiment with milk chocolate or dark chocolate for the “bandages” if that suits your taste. Just ensure the chocolate is melted smoothly and allows for drizzling to create that mummy effect. It’s all part of making your Halloween mummy rice recipe unique! For other chocolate-based recipes, explore our apple pie.
How do I make the mummy rice treats hold their shape better?
The key is to press the cereal mixture firmly and evenly into the pan after melting the marshmallows. Letting it cool completely is also vital. If you find it’s still a bit soft, you can chill the pan for an extra 10 minutes before cutting. This helps create a more stable base for your kid-friendly mummy rice Halloween decorations.
Are there any gluten-free options for this spooky Halloween mummy rice?
Yes! If you need a gluten-free version, simply ensure you use a gluten-free crispy rice cereal. Most mainstream brands are naturally gluten-free, but it’s always good to check the packaging. The rest of the ingredients, like marshmallows and white chocolate, are typically gluten-free as well, making this a versatile treat for various dietary needs. For more information on gluten-free options, you can consult resources on grain versatility.
Variations of Halloween Mummy Rice You Can Try
Once you’ve mastered the classic spooky mummy rice, why not get even more creative? There are so many fun ways to adapt this recipe to suit your taste or dietary needs. These variations keep things exciting and ensure everyone can enjoy a little Halloween fun, whether you’re aiming for cute rice ball mummies or something a bit different.
- Dietary Adaptations: For a vegan version, use vegan marshmallows and a dairy-free butter substitute. Ensure your white chocolate is also dairy-free. This makes for delightful vegan mummy treats!
- Flavor Boost: Add a teaspoon of peppermint extract or a dash of cinnamon to the marshmallow mixture for a unique flavor twist. You could also try using colored candy melts (like orange or green) for the mummy bandages for a different visual effect.
- Shape Shifter: Instead of rectangles, try forming smaller, individual rice ball mummies. Roll the cereal mixture into balls, then flatten slightly before adding the white chocolate “bandages” and eyes. This is a great way to create bite-sized treats.
- Dark Chocolate Mummies: For a richer flavor, use dark chocolate or milk chocolate chips for melting and drizzling. This offers a lovely contrast to the sweet cereal base and provides a different look for your spooky creations.

Spooky Halloween Mummy Rice: 10 Terrific Tips
- Total Time: 25 minutes
- Yield: 12–15 treats 1x
- Diet: Vegetarian
Description
Easy and delightful Halloween Mummy Rice Krispie Treats, perfect for parties. These chewy treats are coated in white chocolate with candy eyes, offering a fun and nostalgic flavor for all ages.
Ingredients
- 6 cups Rice Krispies cereal
- 10 oz marshmallows
- 3 tbsp butter
- 1 cup white chocolate chips
- 1 tbsp shortening (optional, for smoother melting)
- Candy eyes
Instructions
- Melt butter in a large saucepan over low heat.
- Add marshmallows and stir until completely melted.
- Remove from heat and stir in Rice Krispies cereal until well coated.
- Press the mixture evenly into a greased 9×13 inch pan. Let cool.
- Cut into desired shapes, such as rectangles or squares.
- Melt white chocolate chips with shortening (if using) in a microwave-safe bowl in 30-second intervals, stirring in between, until smooth.
- Dip each Rice Krispie treat into the melted white chocolate, coating about two-thirds of the treat.
- Place coated treats on parchment paper.
- Using a piping bag or a plastic bag with a corner snipped off, drizzle melted white chocolate over the treats to create mummy bandages.
- Before the chocolate hardens, place candy eyes on each mummy treat.
- Allow the chocolate to set completely before serving.
Notes
- For easier handling, lightly grease your hands or use cooking spray when pressing the cereal mixture into the pan.
- Ensure the white chocolate is not too hot when dipping the treats to avoid melting them.
- Store leftover mummy rice treats in an airtight container at room temperature.
- Prep Time: 15 minutes
- Cook Time: 10 minutes
- Category: Desserts
- Method: No-Bake
- Cuisine: American
Nutrition
- Serving Size: 1 treat
- Calories: Approx. 150-200
- Sugar: Approx. 15-20g
- Sodium: Approx. 50-70mg
- Fat: Approx. 5-8g
- Saturated Fat: Approx. 3-5g
- Unsaturated Fat: Approx. 2-3g
- Trans Fat: 0g
- Carbohydrates: Approx. 25-30g
- Fiber: Less than 1g
- Protein: Approx. 1-2g
- Cholesterol: Approx. 5-10mg


Leave a Reply