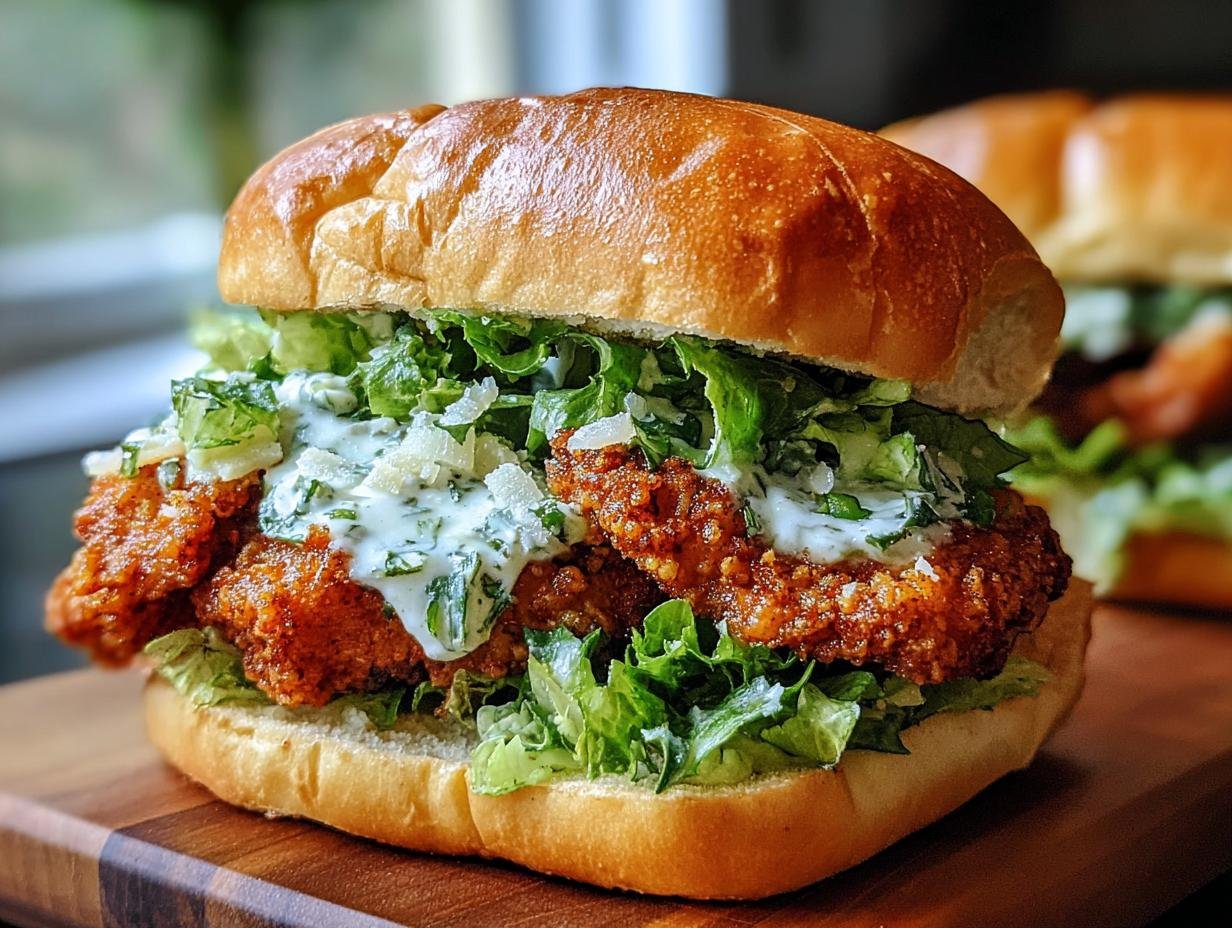
Crispy chicken Caesar sandwich has become my go-to for a quick and satisfying meal, and I bet it will be yours too! Imagine sinking your teeth into perfectly golden, seasoned chicken, nestled between soft buns with that irresistible creamy Caesar dressing and fresh, crisp lettuce. It’s the kind of sandwich that makes your taste buds sing! I remember the first time I tried a homemade version; it was a revelation compared to any fast-food option. It’s so simple, you’ll wonder why you haven’t made an easy crispy chicken Caesar sandwich before. It’s almost as good as a crispy chicken Caesar wrap, but with that delightful bun-to-chicken ratio. Let’s get cooking!
Why You’ll Love This Crispy Chicken Caesar Sandwich
This sandwich is a game-changer for weeknights and lunches! Here’s why it’s a winner:
- Incredible Flavor: The combination of crispy, seasoned chicken, tangy Caesar dressing, and fresh romaine is pure perfection.
- Quick Prep Time: With just 15 minutes of prep, you can have dinner on the table in under 30 minutes.
- A Healthier Choice: Using chicken breast and fresh ingredients makes this a more wholesome option than many fried alternatives.
- Budget-Friendly: You can create a restaurant-quality dish at home for a fraction of the cost.
- Family Approved: Even picky eaters will devour this delicious chicken Caesar sandwich crispy delight.
- Versatile: It’s perfect for a quick lunch, a casual dinner, or even packed for a picnic.
- Satisfying Crunch: That golden, crispy coating on the chicken is totally addictive, making it a truly satisfying chicken Caesar sandwich crispy meal.
Crispy Chicken Caesar Sandwich Ingredients
Gathering these simple items is the first step to making the best crispy chicken Caesar sandwich. You’ll be amazed at how quickly you can create this flavorful meal!
- 1 lb boneless, skinless chicken breasts – pounded to about 1/2-inch thickness for even cooking
- 1 cup all-purpose flour – creates the base for our crispy coating
- 1 teaspoon salt – enhances all the flavors
- 1 teaspoon black pepper – adds a little warmth
- 1 teaspoon garlic powder – for that savory depth
- 1 teaspoon paprika – gives a beautiful color and mild flavor
- 1/2 teaspoon cayenne pepper (optional) – for a touch of heat
- 2 large eggs – the binder for our breading
- 1 tablespoon water – thins the eggs slightly for better coating
- 1 cup panko breadcrumbs – these give the ultimate crunch!
- 1/2 cup grated Parmesan cheese – mixed with panko for cheesy goodness
- 4 soft burger buns – the perfect soft vehicle for our chicken
- 4 cups chopped romaine lettuce – for that essential crisp freshness
- 1/2 cup Caesar dressing – the creamy, tangy heart of the sandwich
- 1/4 cup shaved Parmesan cheese for garnish – a little extra fancy touch!

How to Make Crispy Chicken Caesar Sandwich
Let’s get this delicious sandwich made! Following these steps ensures a perfectly cooked, flavorful bite every time. It’s truly a straightforward process, making it easy to understand how to make crispy chicken Caesar sandwich at home.
- Step 1: Prepare the chicken. First things first, grab your chicken breasts and place them between parchment paper or plastic wrap. Use a meat mallet or a rolling pin to gently pound them to about a 1/2-inch thickness. This ensures even cooking and a tender bite.
- Step 2: Set up your dredging stations. You’ll need three shallow dishes. In the first, combine 1 cup all-purpose flour with 1 teaspoon salt, 1 teaspoon black pepper, 1 teaspoon garlic powder, 1 teaspoon paprika, and the optional 1/2 teaspoon cayenne pepper. In the second dish, whisk 2 large eggs with 1 tablespoon water until smooth. For the third dish, mix 1 cup panko breadcrumbs with 1/2 cup grated Parmesan cheese.
- Step 3: Bread the chicken. Take each pounded chicken breast and dredge it first in the seasoned flour mixture, making sure to coat all sides. Then, dip it into the egg wash, letting any excess drip off. Finally, press the chicken firmly into the panko-Parmesan mixture, ensuring a thick, even coating. This is key for that amazing crunch!
- Step 4: Cook the chicken. Heat about 1 inch of vegetable oil in a large skillet over medium-high heat until it shimmers. Carefully place the breaded chicken breasts into the hot oil. Fry about 3-4 minutes per side, until they are a beautiful golden brown and cooked through. You’ll know they’re done when the internal temperature reaches 165°F (74°C). Drain them on a paper towel-lined plate to absorb any excess oil. This method results in a fantastic crispy fried chicken Caesar sandwich recipe.
- Step 5: Assemble the sandwiches. Lightly toast your 4 soft burger buns – I love doing this on a dry skillet or under the broiler for a minute. Spread a generous amount of 1/2 cup Caesar dressing on the bottom half of each bun. Pile on the 4 cups chopped romaine lettuce, followed by a piece of your perfectly crispy chicken. Finish with a sprinkle of 1/4 cup shaved Parmesan cheese for garnish, then place the top bun on. Enjoy your masterpiece!
Pro Tips for the Best Crispy Chicken Caesar Sandwich
Want to elevate your sandwich game? I’ve got a few tricks up my sleeve to ensure your crispy chicken Caesar sandwich is absolutely perfect every single time. These little tips make a big difference!
- For an ultra-crispy coating, try double-dipping your chicken. After the first panko coating, dip it back into the egg wash and then into the panko-Parmesan mixture again. It creates an amazing crunch!
- Don’t overcrowd the skillet when frying. Cook the chicken in batches to maintain the oil temperature, ensuring each piece gets perfectly golden and crispy without getting greasy.
- Season generously at every stage! The flour mixture, the breadcrumbs, and even a little sprinkle on the chicken before breading all contribute to the overall flavor.
What’s the secret to a perfect Crispy Chicken Caesar Sandwich?
The secret lies in the triple-threat breading: flour, egg, and panko-Parmesan. This combo guarantees that signature crunch. For an amazing caesar salad sandwich with crispy chicken, ensure your chicken is pounded evenly and the oil is hot but not smoking. For more on achieving perfect textures, check out these tips on the joy of vegetable gardening.
Can I make Crispy Chicken Caesar Sandwich ahead of time?
You can definitely prepare the components ahead of time! Bread the chicken and store it in the fridge on a baking sheet covered with plastic wrap for up to 24 hours before frying. The lettuce and dressing can also be prepped.
How do I avoid common mistakes with Crispy Chicken Caesar Sandwich?
Avoid soggy chicken by ensuring your oil is hot enough before frying and not overcrowding the pan. Also, don’t skip pounding the chicken; uneven thickness leads to uneven cooking and can result in dry spots. For more on cooking techniques, you might find this article on sustainable farming practices interesting.
Best Ways to Serve Crispy Chicken Caesar Sandwich
This sandwich is fantastic on its own, but I love pairing it with a few complementary sides to make a complete meal. For the best crispy chicken Caesar sandwich experience, consider these options!
- Classic Fries: You can’t go wrong with a side of crispy, golden french fries. They perfectly echo the crunch of the chicken.
- Light Salad: A simple side salad with a vinaigrette dressing offers a refreshing contrast to the rich flavors of the sandwich. Think a light lemon herb dressing to cut through the richness.
- Coleslaw: A creamy or vinegar-based coleslaw adds another layer of texture and a tangy flavor that complements the Caesar dressing beautifully.

Nutrition Facts for Crispy Chicken Caesar Sandwich
Here’s a breakdown of the nutritional information for one of these delightful sandwiches. It’s a satisfying meal that balances flavor and texture!
- Calories: 600
- Fat: 30g
- Saturated Fat: 8g
- Protein: 35g
- Carbohydrates: 45g
- Fiber: 3g
- Sugar: 5g
- Sodium: 950mg
Nutritional values are estimates and can vary based on specific ingredients used, especially the Caesar dressing and bun choice.
How to Store and Reheat Crispy Chicken Caesar Sandwich
Even though these sandwiches are best enjoyed fresh, I’ve found a few ways to store and reheat them so you can still enjoy that delicious crispy chicken Caesar goodness later. Proper storage is key, especially if you’ve made a batch for meal prep or have leftovers from a larger gathering. Think of it like saving your favorite chicken Caesar wrap crispy recipe for another day!
- Cool Completely: Always let the fried chicken cool down entirely before storing. This prevents condensation that can make the coating soggy.
- Fridge Storage: Store leftover cooked chicken in an airtight container in the refrigerator for up to 3-4 days. Keep the assembled sandwich components separate if possible (lettuce, dressing, bun) to maintain freshness.
- Freezer Storage: For longer storage, you can freeze the cooked, cooled chicken breasts. Wrap them tightly in plastic wrap, then in foil, and place them in a freezer-safe bag for up to 3 months.
- Reheating Fried Chicken: The best way to reheat is in a toaster oven or regular oven at 375°F (190°C) for about 5-10 minutes, or until heated through and crispy again. Avoid the microwave, as it can make the chicken rubbery.
- Reheating a Whole Sandwich: If you need to reheat an assembled sandwich, it’s best to reheat just the chicken separately and then reassemble with fresh lettuce and dressing.
Frequently Asked Questions About Crispy Chicken Caesar Sandwich
What is a Crispy Chicken Caesar Sandwich?
A crispy chicken Caesar sandwich is a delightful creation that takes the classic Caesar salad and transforms it into a handheld meal. It features a piece of golden, crispy fried chicken, typically seasoned and breaded, layered with creamy Caesar dressing, crisp romaine lettuce, and often Parmesan cheese, all served on a soft bun. It’s a satisfying combination of textures and flavors.
Why is the Crispy Chicken Caesar Sandwich so popular?
Its popularity stems from a perfect storm of deliciousness! The appeal lies in the irresistible crunch of the fried chicken, the savory, tangy Caesar dressing, and the fresh, crisp lettuce – all familiar and comforting flavors. It’s an elevated take on a classic, offering a satisfying texture and a burst of flavor that appeals to a wide range of tastes, making it a favorite for many.
Can I make the chicken crispy without deep frying?
Absolutely! While frying yields the crispiest results, you can achieve a wonderfully crispy coating by baking or air frying. For baking, place the breaded chicken on a wire rack set over a baking sheet at around 400°F (200°C) for 20-25 minutes, flipping halfway. An air fryer works great too, typically at 380°F (190°C) for about 10-12 minutes, flipping once.
What are the best buns for a Crispy Chicken Caesar Sandwich?
Soft, slightly sweet buns work best to complement the savory and tangy flavors of the sandwich. Brioche buns are a fantastic choice for their rich flavor and soft texture. Potato buns are also excellent, offering a lovely chewiness. Even a good quality standard burger bun will do the trick!
Variations of Crispy Chicken Caesar Sandwich You Can Try
Once you’ve mastered the classic, there are so many fun ways to switch up your crispy chicken Caesar sandwich! I love experimenting with different flavors and cooking methods to keep things exciting.
- Spicy Kick: For a fiery twist, try making a spicy crispy chicken Caesar sandwich by adding more cayenne pepper to the flour mixture or a dash of hot sauce to the Caesar dressing. You could also top it with pickled jalapeños for an extra zing.
- Buttermilk Brine: Elevate your chicken by soaking it in a buttermilk brine before breading. This creates an incredibly tender and moist chicken for your buttermilk crispy chicken Caesar sandwich. Just mix 1 cup of buttermilk with a tablespoon of hot sauce and soak the chicken for at least 30 minutes.
- Lemon Herb Twist: Infuse fresh flavors by adding lemon zest and fresh herbs like parsley or dill to the panko breadcrumbs. This brightens up the sandwich and offers a refreshing counterpoint to the rich Caesar dressing.
- Caesar Wrap Version: If you prefer a lighter option, skip the bun altogether and serve your crispy chicken, lettuce, and dressing in a large tortilla for a delicious crispy chicken Caesar wrap.

Crispy Chicken Caesar Sandwich: 15-Min Flavor Blitz
- Total Time: 25 minutes
- Yield: 4 servings 1x
- Diet: Vegetarian
Description
A delicious and easy-to-make Crispy Chicken Caesar Sandwich featuring golden-brown seasoned chicken, creamy Caesar dressing, crisp romaine lettuce, and shaved Parmesan cheese on a soft bun.
Ingredients
- 1 lb boneless, skinless chicken breasts
- 1 cup all-purpose flour
- 1 teaspoon salt
- 1 teaspoon black pepper
- 1 teaspoon garlic powder
- 1 teaspoon paprika
- 1/2 teaspoon cayenne pepper (optional)
- 2 large eggs
- 1 tablespoon water
- 1 cup panko breadcrumbs
- 1/2 cup grated Parmesan cheese
- 4 soft burger buns
- 4 cups chopped romaine lettuce
- 1/2 cup Caesar dressing
- 1/4 cup shaved Parmesan cheese for garnish
Instructions
- Prepare the chicken: Pound chicken breasts to about 1/2-inch thickness.
- Set up dredging stations: In one shallow dish, mix flour, salt, pepper, garlic powder, paprika, and cayenne. In another shallow dish, whisk eggs with water. In a third shallow dish, combine panko breadcrumbs and 1/2 cup grated Parmesan cheese.
- Bread the chicken: Dip each chicken breast first in the flour mixture, then in the egg mixture, and finally coat thoroughly with the panko-Parmesan mixture.
- Cook the chicken: Heat 1 inch of vegetable oil in a large skillet over medium-high heat. Fry chicken for 3-4 minutes per side, until golden brown and cooked through. Drain on paper towels.
- Assemble the sandwiches: Toast the burger buns lightly. Spread Caesar dressing on the bottom half of each bun. Top with chopped romaine lettuce, a crispy chicken breast, and shaved Parmesan cheese. Place the top bun on.
Notes
- For an extra crispy coating, double-dip the chicken in the egg and panko mixtures.
- Adjust cayenne pepper to your spice preference.
- You can bake the chicken at 400°F (200°C) for 20-25 minutes if you prefer not to fry.
- Use your favorite store-bought or homemade Caesar dressing.
- Add other toppings like tomatoes or red onion if desired.
- Prep Time: 15 minutes
- Cook Time: 10 minutes
- Category: Sandwich
- Method: Frying
- Cuisine: American
Nutrition
- Serving Size: 1 sandwich
- Calories: 600
- Sugar: 5g
- Sodium: 950mg
- Fat: 30g
- Saturated Fat: 8g
- Unsaturated Fat: 22g
- Trans Fat: 0g
- Carbohydrates: 45g
- Fiber: 3g
- Protein: 35g
- Cholesterol: 120mg


Leave a Reply